Showing posts with label how to. Show all posts

Tuesday, February 12, 2008

How to set up a greeting card business Part 3


You’re almost done, at least for the layout, printing and packaging part of you’re new greeting card venture.

Once I get a shipment of printed cards back from the printer, I inventory them and put them away in their proper archival storage container until needed. This storage is easier than you might think because the cards are delivered to me “flat” or un-folded. Each card is “scored” down the middle of it providing a perfect guide on which to fold the card in half from.

In the beginning of my “greeting card career” it was easy to store the cards. I initially only printed 60 designs and all of the cards stored neatly on one self in my studio. Now that I have almost 300 different card designs, the process is a bit more difficult, but I can still store them in one area of my studio. With the addition of my new distributor I might be faced with a larger storage problem than I ever had before. That will be a good problem to have to deal with.

After each art festival I do, I take an inventory of both my cards and prints. That count gives me an idea of what I need to print and frame along with which greeting cards I need to assemble. I say assemble because that’s basically what happens. I pull the desired amount of cards of each deign I need from storage and place them on a workbench in the studio. I then “fold” the cards down the scored line I talked about and put all of the folded cards aside. Because the majority of the cards I sell are 5” x 7” I use an A-7 Arrow White card from Heinrich Envelope Company. The color white not only goes with every thing but also is the cheapest, under .02 each.

I place the folded cards on the bench next to the envelopes and one by one, insert an envelope into the center of the folded card and set aside.

To give my card line a touch of class I package the card and envelope into a clear plastic bag (#B75) that I purchase from ClearBags.

The extra .06 I spend on each one of the clear bags is well worth it. Not only does it keep the card and envelope together it keeps them both clean and free from dirty finger prints that would inevitably get all over the cards when my customer browse through them in my spin rack. I’ve witnessed many other artists run for cover to try and save their greeting cards when an unexpected rainstorm hits. The clear bags protect the cards from getting wet.

Now you have my secrets. Well not exactly secrets but the tips I’ve laid out over the past 3 articles will save you a good amount of time researching out my sources, plus, if you follow these steps you’ll be able to safely add a great deal of extra sales income to your already existing art business. I did, you can too.

How much extra of course will depend on how many shows you do each year and if you seek out a greeting card distributor to wholesale your cards for you. I charge $3.00 each for my cards which is a very fair price for the end user plus it gives you enough room to sell to stores at half of that so that they can mark up (keystone) the cards to your suggested retail price.

Are you willing to take the chance?
Monday, February 11, 2008

How to set up a greeting card business Part 2


As I mentioned yesterday, I not only used to do all of my own greeting card printing but, prior to printing I had to first do all of my own card layout. There are many different computer programs that allow you to do this type layout work. Quark Express, Adobe Illustrator or even Microsoft Publisher that comes with many of Microsoft’s “Office” suites will work. Publisher is a capable graphics program, especially if you are part of the “Windows” culture. I’ve used a number of them but finally stepped to a high-end program from Adobe called InDesign.

Years ago, when I first started my greeting card line, I set up my first series of cards in Publisher. It was simple to use and gave me good results. When I was doing my own card printing I was able to control the process from layout to print so if I hit a snag with the program, I was able to figure out a work around for it.

Once I out sourced my printing I quickly discovered that pro print houses had difficulties working with the files from low-level layout programs like Publisher. Because they aren’t set up to efficiently take my layouts and feed them directly into their presses I incurred an additional set up charge for each design I sent them. It wasn’t much ($5.00 per card) but because they had to re-format 60 cards that small $5.00 fee turned into a whopping $300.00 set up charge I wasn’t counting on.

Taking the advice of the print shops graphics director, I started using Adobe’s InDesign to do my layout and haven’t run into any compatibility programs since making the switch. This program is fairly expensive and has a steep learning curve so if you are just starting out or have just a few cards you’d like to have done, you might be better off with another, less complicated program.

If you are like me and convinced that the addition of a greeting card line with greatly increase your yearly profits, by all means, take the plunge and start off right from the beginning with InDesign.

If you do, here are the steps I go through to create a PDF ready card that any printer can use.

The first thing that needs to happen is that you need to do is to convert the image you’ll be using for the front of your greeting card into a format that your printer will find compatible. The most common, and the one I use is JPG. If you will be creating standard size cards such as a 5” x 7” you will need to size your image to 5.125” x 7.25” which will give you a photo that will completely cover the front of your card and not have that amateurish white border surrounding the image. In the industry, this technique is called “the bleed.” By having your image slightly larger than the final card size (front side) the printer will be able to print the card and do a final trim to the finished size you’re after, thus leaving only the image on the front showing.

I use PhotoShop to do my post processing work (adding a “plate signature” layer) for my fractals so I’m very familiar with this program so I also use it to re-size my images down to the size I need for my cards and then save it as a JPG there. While in PhotoShop I also create a much smaller copy of the image on the front for a thumbnail image for the rear of the card. This step isn’t necessary but I find it gives a more finished touch to my line.

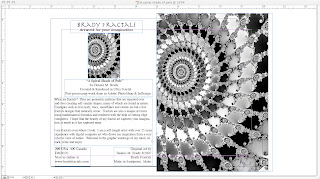
Once I have all of the images for the cards I want to layout done I open another program (InDesign) and start my layout. Using the size example stated above I start by going to File>New>Document and size a new document to 7” x 10” which allows me to have a folded 5” x 7” finished card. I like to have the ruler and snap to guides optioned which helps me distinguish the front from the back of the card. If I’m working on a “vertical” image, the layout will be 10” wide by 7” tall with a grid line (invisible in the final printing) down the center. Using the “rectangle frame tool” I then create a 5.125” x 7.25” “box” on the right side of the layout. Then I go to File>Place and browse to where my images are stored on my hard drive and select the image I’ll be using for the card which I “place” in the rectangle I created.

After the image appears, I make sure that it fills the entire box I made. If for any reason it doesn’t I use the Object>Fitting>Fit contents to frame command. That should expand your JPG to fit into the rectangle box you made.

I then turn my attentions to the “back side” of the card. Here I make a series of smaller rectangular boxes like I did for the front of the card image but instead of “Placing” a JPG into it I click on the “Text” tool button and type in the desired “copy” that I want on the back of the card. Depending on how much you want to say will determine how large these boxes are. I try to use a font size large enough for people to read but small enough to fit in everything I need.

For my cards, I have 6 different rectangles. I use one for a thumbnail size image of what’s on the front of the card. One for the “body copy” and 2 others that contain the company name, address, website info and copyright symbols. The last rectangle is for my company name/logo.

After I do this preliminary layout I do a visual, on computer check to make sure that every thing is in it’s correct place and even sometimes print out a hard copy. Once I’m satisfied with the results I save the file as an. indd file (suffix for InDesign) and then export the finished file as a PDF for printing. This step might not be necessary if your printer wants the file in a format that they can tweak but prefer providing them with the un-tweakable finish file ready for the press. That way, I know exactly what the final card will look like right there on my computer.

After they’re printed and delivered back to you comes the final step. I’ll cover that tomorrow.

Sunday, February 10, 2008

How to set up a greeting card business - Part 1


I love greeting cards and if you’re an artist trying to make a living selling your art, you should too. A few articles ago I mentioned that I recently set up a distribution deal with “Starshine Arts” in Eugene OR. Here is how I got this far.

Artist’s opinions on greeting cards vary. Many feel that if they were to offer cards for sale, their matted and or framed print sales would suffer. Others, like myself, find them a valuable income stream adding to my art sales. I can’t remember the last time I did a show that I did not cover my booth fees with greeting card sales alone. To me, greeting cards enhance my total sales.

Every artist has to decide for him or herself whether or not to add cards to their mix but I can speak from experience that at least for me, they work out great. I had seasoned artists tell me that greeting cards would degrade my work not enhanced it. When I listened, I missed out on a respectable portion of my yearly sales. When I finally tried cards and found out how many people purchased them because they either could not afford my larger prints or just wasn’t in the market for art but bought the cards anyway because of their affordability I got over the stigma of what others thought.

Now, I don’t leave home for a show without them.

Like others who gradually get into selling greeting cards of their designs, I printed my own, in my studio, on cards that came in “kit form” from different paper companies like Kodak, HP, Staples etc. I grumbled everything I ran out of a certain card instead of being happy I was out and needed to print more. I reasoned that it took me the same amount of computer/printer time to print a card as it did for one of my 8x10 prints and because I sold my prints for nearly 10 times that of a card, I was loosing money every time I printed a card.

Correct thinking, just not thought out completely. Once I decided that greeting cards were going to stay, I looked for ways to make the whole process more efficient. Local printers could handle the printing of the cards for me and then all I would need to do was to fold, insert an envelope into the center of the card and put them both into a clear plastic sleeve. The logic was right but it didn’t scale. Local printers needed quantities of at least 1000 cards PER design to get the price per card down to where I needed it to be. Since I had over 200 different cards I wanted printed that was out of the question.

I started researching a better alternative and found out that a new, at least to me, Indigo digital printing press was being used for “short” runs which would make it feasible to order quantities of 50 cards of each design instead of 1000. I settled on one firm in Canada but have since discovered many companies offering the same service.

Now when I run out of a certain design I don’t get bummed and head to the Epson 4000 and start printing, I just e-mail my supplier and request X number of cards of X design. They print them and 7-10 days latter I have the cards back in stock. Ready to allow me to sell enough to cover that ever-increasing art festival booth fee, I hope.

Tomorrow I’ll cover the details of how I layout my cards in PhotoShop and InDesign.

Thursday, January 31, 2008

How to find the right shows


Have you ever applied for a job before? Chances are that most people reading this can say that one time or another in their careers they’ve researched located and applied for a job. It’s never a fun thing to do, or at least it never was for me.

Partly because of that, I’ve been self-employed since my early 20’s. I hate rejection. Not that I ever applied for a position thinking that I wasn’t right for the job, but once learning that I wasn’t hired I didn’t know if it was the rejection of not getting it or the lame excuses why I didn’t that bothered me the most.

“We were highly impressed with your résumé, but we found someone else better suited to our needs.”

“Your work record looks impeccable and we would love to have a person with your skills work for us but, you just aren’t as qualified as the other applications.”

“The quality of your portfolio is magnificent, but we thought that you wouldn’t be as good of a fit as others we looked at.”


Enough already, I get the picture.

Well, an artist goes through that same scenario for every art festival they apply to. If you’re a busy artist that attends many different shows each year you know what I mean. Imagine applying to 30 different jobs a year. Every application comes with the ever-present chance of rejection. That’s exactly what the artist goes through each time they send in their application, jury fees and images of their work. Then they wait for the thick postage paid envelope to arrive (obviously filled with the slides/cd/photos you submitted to be juried) informing them that,

“We were highly impressed with your artist statement and the slides of your work were some of the most impressive pieces the judges have looked at this year, but, we’re sorry to inform you that you have not been chosen to participate in this years festival.”

WTF, how can that be? They said they loved my work. That is what we go through every time we roll the dice and apply to a festival. The process makes my stomach turn. I always start the year by making sure I have an ample supply of Rolaids and Tums available.

That said, there are ways to minimize these inevitable rejection letters. The first (and probably the most important) step in the application process is finding the best show for your type of art. If you’re an abstract surrealist, it doesn’t make sense to send in an application to western themed dominated show in the southwest. Likewise if you paint old west scenes you might want to stay clear of a show held in the SoMa district of a large urban city.

Go where your market is. Staying in the old west vernacular, don’t use a shotgun when a rifle is a better choice. Pin point your applications, don’t just apply to every show out there. First off, you’d go broke in jury fees alone and more importantly, sitting through a 3 day festival watching patrons stir clear of your booth like you had a sign hung in the front of it informing people that you have a deadly contagious disease is really a bummer.

Again, go where your market is.

Well, how do you find the right show? There is no one right answer but there are a series of thing to make your chances better.

1. Ask fellow artists what shows are working for them. Be careful on this one because some artist’s guard which shows are the best like their life depended on it and their financial life might, especially if you both do the same type of art.

2. Read trade journals and festival directories. These will at least give you the names and dates of the shows but not necessarily which ones are the best for you. The one I find myself using the most now days is The Art Fair Source Book. The owner of this publication, Greg Lawler, is not only a friend but in my opinion, a genius when it comes to offering unbiased, researched show information.

3. Subscribe to on-line directories. This is after all, 2008. If you are still complaining that shows aren’t accepting slides any longer and they require you to submit your application and images digitally, wake up. Those antiquated days are over. An ever-increasing percentage of the Top 100 shows are already on ZAPP, and for a good reason, it works. Instant processing of your application, your images are stored on their severs so you don’t have to worry if you just sent off your last booth slide to another show.

Even if the better shows aren’t signed up to use ZAPP now, they are adopting many of the digital image requirements into their submittal process and will probably be just a matter of time before they too, only except apps through ZAPP.

I’m currently finishing off a video tutorial on many of the features that artists find so “scary” with ZAPP and I’ll post a link to it when it’s done. I’ll be covering every thing from how to set your ZAPP account up, image preparation, artist statements and more.

To try and not turn this post into a novel, I’ll cover a few other methods on finding the correct shows later.

PS. Happy 54th birthday Dennis Brady Studio ☺